Varnish is an open-source web application accelerator, designed to improve the performance of busy, dynamic websites. It operates as a reverse proxy, caching frequently accessed content in memory and delivering it to users quickly. In this blog, we'll show you how to configure Varnish on Ubuntu AWS.
Before you begin, it is important to update your Ubuntu instance to ensure that you have the latest software packages. To do this, run the following command:
sudo apt-get update && sudo apt-get upgrade
Once your system is up to date, you can proceed with installing Varnish. To install Varnish on Ubuntu, run the following command:
sudo apt-get install varnish
We are done with varnish installation, now will proceed by configuring varnish as a reverse proxy server
Install nginx using command: sudo apt install nginx
Configure your web server to listen on a port other than the
default port 80 because Varnish responds directly to incoming
HTTP requests, not the web server. In the sections that
follow, we will use port 8080.
Access the conf.d file in the Nginx directory, create a
'varnish.conf' file, and paste the following code.
                                server {
                                listen 8080;
                                proxy_buffer_size 8080;
                                proxy_buffers 8080;
                                proxy_busy_buffers_size 8080;
                                proxy_read_timeout 8080;
                                proxy_intercept_errors 8080;
                                location / {
                                # this causes DNS resolution of upstream every 10 minutes
                                resolver 10.0.0.2 valid=600s;
                                # setting backend as a variable in proxy_pass ensures cache invalidation of DNS lookup
                                # because nginx will requery name servers according to resolver defined above
                                set $backend_servers https://internal-alb-xxxxxxxxxx.us-east-1.elb.amazonaws.com;
                                proxy_pass $backend_servers;
                                proxy_set_header X-Forwarded-Proto $scheme;
                                proxy_set_header Ssl-Offloaded $scheme;
                                proxy_set_header Host $host;
                                proxy_set_header X-Forwarded-Host $host;
                                proxy_http_version 1.1;
                                proxy_set_header Connection "";
                                proxy_set_header X-Forwarded-For $proxy_add_x_forwarded_for;
                                  }
                                 }
Make sure to replace the
$backend_servers with the private IP of the
backend server or the internal ALB (private) of the server.
Make sure that your Nginx configuration is correct.

Then, restart Nginx by running:
Systemctl restart nginx
As a user with root privileges, open your Vanish configuration file using a text editor:
root@ip-10-0-11-163:~# vi /etc/default/varnish
Make sure that DAEMON_OPTS contains the correct listening port for the -a parameter:

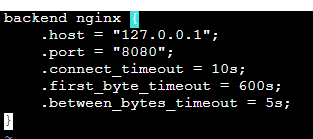
Open the file "/etc/varnish/backends.vcl" in a text editor and replace the value of ".host" with the IP address of the localhost and the listen port of the Varnish backend. This is the server that provides the content that Varnish will accelerate. Also, replace the value of ". port" with the listen port of the web server.

Restart varnish
Service restart varnish
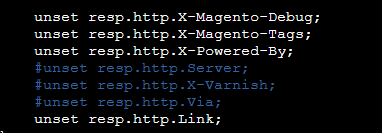
Modify the default.vcl file located in the /etc/varnish/ directory, and uncomment the following lines to allow responses to be returned back from Varnish.

You can check the configuration file:
https://github.com/magento/magento2/blob/9544fb243d5848a497d4ea7b88e08609376ac39e/app/code/Magento/PageCache/etc/varnish6.vcl#L193
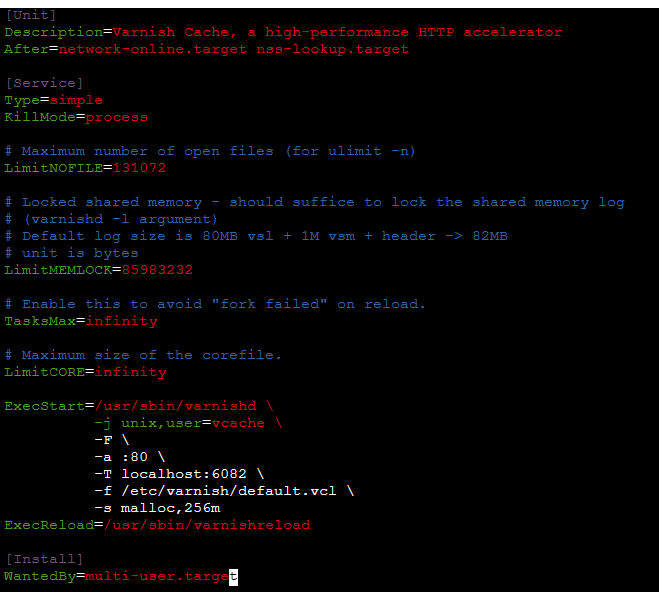
You need to change the Varnish start parameters in the systemd service definition as well. To do so, edit the line starting with ExecStart in the service definition file. Open the varnish.service file located under /usr/lib/systemd/system, and make sure the information matches the snapshot below:

Afterwards, tell systemctl to reload it's config files and to restart the service
                                systemctl daemon-reload
                                systemctl restart varnish
Varnish is now running on port 80:
netstat -tulpn | grep varnish


